Nový standard Agent Skills pro vaše kódovací pracanty v GitHub Copilot
Jak pracovat s kontextem v AI coding nástrojích nebo naučit agenta používat vámi předem připravené skripty? Jde to vyřešit promptováním v AGENTS.md, ale to není standardizovaný postup a ne vždy se to podaří - chování bude hodně závislé na použitém modelu a hůře předvídatelné. Pro lepší výsledky lze použít Model Context Protocol, ale to už znamená napsat nějaký kus software a je to celkově robustnější a pro některé situace zbytečně složité. Proto se dnes zaměříme na variantu někde mezi tím - Agent Skills.
O co jde a v čem je to jiné než AGENTS.MD nebo MCP
AGENTS.MD je soubor s instrukcemi pro agenta. Ve VS Code ho GitHub Copilot umí (dle nastavení) automaticky přidávat do chat kontextu, typicky jako „projektové instrukce“ - jak se má chovat, jaké standardy má dodržovat, případně mu pomoci se orientovat ve vašem repozitáři (kde najde specifikace, kódovací standardy, jak je členěný zdroják atd.). VS Code také umí (experimentálně) pracovat s AGENTS.md v podadresářích - pak agent volí relevantní instrukce podle toho, ve které části repozitáře zrovna pracuje.
MCP je definice nástrojů, kdy agent má k dispozici seznam dostupných nástrojů s krátkým popisem k čemu jsou dobré a jaké argumenty očekávají. Takhle se řeší základní věci editoru typu VS Code (prohledání kódové báze, čtení a úpravy souborů, spouštění lokálních příkazů a skriptů, vytváření todo, stahování stránek z webu), ale i celá plejáda dalších nástrojů jako je přístup do Azure, GitHubu, Kubernetes, PostgreSQL, Jira, ale i do vašich proprietárních API a služeb. MCP je nejen pro kódovací agenty, ale i pro různé konverzační a byznysové agenty a kromě toho, že umí běžet lokálně, tak hlavně je to ucelený protokol pro discovery operací, zabezpečení a velmi robustní a univerzální řešení.
Skills jsou něco mezi tím. Podobně jako AGENTS.md to jsou prostě jen lokální soubory (typicky v konkrétním adresáři v repo, v případě GitHubu je to .github/skills/jmenoskillu nebo .claude/skills/jmenoskillu), ale finta je v tom, že se nenačítají celé do kontextu. Podobně jako u MCP se do kontextu umístí pouze jejich seznam a popis, ale ne nic dalšího. Agent tak ví co v nich najde, ale nemá jejich detailním obsahem zaplněn kontext. To je dobré, protože to snižuje latenci, někdy náklady (u GitHub Copilot platíte ve formě Premium Requests, takže to tolik řešit nemusíte, ale jinde to hraje velkou roli), ale hlavně zjednoduší to agentovi život. Příliš mnoho informací, které nejsou relevantní k aktuálně řešené úloze, často snižuje celkovou kvalitu jeho práce. Zkrátka je toho na něj moc, ztrácí se v tom.
Poznámka: v době psaní jsou Agent Skills ve VS Code dostupné od verze 1.108 (už uvolněná verze) jako experimentální/preview funkce a je potřeba je explicitně zapnout nastavením chat.useAgentSkills.
Struktura adresáře je předepsaná. Musí tam být soubor SKILL.md, který má YAML hlavičku s názvem a popisem a dále tělo, kde mohou být jakékoli instrukce a podrobnosti. Kromě toho v tomto adresáři můžete mít další soubory a popsat jejich roli v rámci textu ve SKILL.md, tedy typicky jednotlivé skripty a utilitky, k čemu jsou a jak se používají, tedy jaké mají argumenty a tak podobně.
Použití Skills pro dynamické načítání kontextu
Jak to funguje si vyzkoušejme na jednoduchém příkladu - tedy je můj SKILL.md:
1
2
3
4
5
6
7
8
---
name: simplecontext
description: This contains information about company project code-named BigDog
---

Here are information about this project:
- Owner: Michael Coder
- Inventary number: 54321
Využijeme toho, že ve VS Code umíme přesně zobrazit, co je součástí kontextu a jak to celé funguje pod kapotou (Chat Debug view / log requestů do modelu). Nejdřív do chatu napíšu jednoduše Ping a podívám se co se do modelu poslalo.
Nejdřív to jsou metadata, ve kterých je hodně prostoru věnováno popisu zabudovaných nástrojů a MCP serverů, například:
1
2
3
4
5
6
7
8
9
10
11
12
13
14
15
16
17
18
19
20
21
22
23
24
25
26
27
28
29
30
31
32
33
34
35
36
37
38
39
40
41
42
43
44
45
[
    {
        "function": {
            "name": "apply_patch",
            "description": "Edit text files. Do not use this tool to edit Jupyter notebooks. `apply_patch` allows you to execute a diff/patch against a text file, but the format of the diff specification is unique to this task, so pay careful attention to these instructions. To use the `apply_patch` command, you should pass a message of the following structure as \"input\":\n\n*** Begin Patch\n[YOUR_PATCH]\n*** End Patch\n\nWhere [YOUR_PATCH] is the actual content of your patch, specified in the following V4A diff format.\n\n*** [ACTION] File: [/absolute/path/to/file] -> ACTION can be one of Add, Update, or Delete.\nAn example of a message that you might pass as \"input\" to this function, in order to apply a patch, is shown below.\n\n*** Begin Patch\n*** Update File: /Users/someone/pygorithm/searching/binary_search.py\n@@class BaseClass\n@@    def search():\n-        pass\n+        raise NotImplementedError()\n\n@@class Subclass\n@@    def search():\n-        pass\n+        raise NotImplementedError()\n\n*** End Patch\nDo not use line numbers in this diff format.",
            "parameters": {
                "type": "object",
                "properties": {
                    "input": {
                        "type": "string",
                        "description": "The edit patch to apply."
                    },
                    "explanation": {
                        "type": "string",
                        "description": "A short description of what the tool call is aiming to achieve."
                    }
                },
                "required": [
                    "input",
                    "explanation"
                ]
            }
        },
        "type": "function"
    },
    {
        "function": {
            "name": "create_directory",
            "description": "Create a new directory structure in the workspace. Will recursively create all directories in the path, like mkdir -p. You do not need to use this tool before using create_file, that tool will automatically create the needed directories.",
            "parameters": {
                "type": "object",
                "properties": {
                    "dirPath": {
                        "type": "string",
                        "description": "The absolute path to the directory to create."
                    }
                },
                "required": [
                    "dirPath"
                ]
            }
        },
        "type": "function"
    }
]
Pak následuje zabudovaný system prompt, kde Copilot popisuje roli agenta, jeho osobnost, vysvětluje jak má používat nástroje a tak podobně. Tady je krátký výsek:
1
2
3
4
5
6
7
8
9
10
11
12
13
14
15
16
17
18
19
20
21
22
23
24
25
26
27
28
29
30
31
32
33
34
35
36
37
38
39
40
41
42
43
44
45
46
47
48
49
50
51
52
53
You are an expert AI programming assistant, working with a user in the VS Code editor.
Your name is GitHub Copilot. When asked about the model you are using, state that you are using GPT-5 mini.
Follow Microsoft content policies.
Avoid content that violates copyrights.
If you are asked to generate content that is harmful, hateful, racist, sexist, lewd, or violent, only respond with "Sorry, I can't assist with that."
<coding_agent_instructions>
You are a coding agent running in VS Code. You are expected to be precise, safe, and helpful.
Your capabilities:
- Receive user prompts and other context provided by the workspace, such as files in the environment.
- Communicate with the user by streaming thinking & responses, and by making & updating plans.
- Execute a wide range of development tasks including file operations, code analysis, testing, workspace management, and external integrations.

</coding_agent_instructions>
<personality>
Your default personality and tone is concise, direct, and friendly. You communicate efficiently, always keeping the user clearly informed about ongoing actions without unnecessary detail. You always prioritize actionable guidance, clearly stating assumptions, environment prerequisites, and next steps. Unless explicitly asked, you avoid excessively verbose explanations about your work.

</personality>
<tool_preambles>
Before making tool calls, send a brief preamble to the user explaining what you're about to do. When sending preamble messages, follow these principles:
- Logically group related actions: if you're about to run several related commands, describe them together in one preamble rather than sending a separate note for each.
- Keep it concise: be no more than 1-2 sentences (8-12 words for quick updates).
- Build on prior context: if this is not your first tool call, use the preamble message to connect the dots with what's been done so far and create a sense of momentum and clarity for the user to understand your next actions.
- Keep your tone light, friendly and curious: add small touches of personality in preambles to feel collaborative and engaging.
Examples of good preambles:
- "I've explored the repo; now checking the API route definitions."
- "Next, I'll patch the config and update the related tests."
- "I'm about to scaffold the CLI commands and helper functions."
- "Config's looking tidy. Next up is patching helpers to keep things in sync."

Avoiding preambles when:
- Avoiding a preamble for every trivial read (e.g., `cat` a single file) unless it's part of a larger grouped action.
- Jumping straight into tool calls without explaining what's about to happen.
- Writing overly long or speculative preambles — focus on immediate, tangible next steps.

</tool_preambles>
<planning>
You have access to an `manage_todo_list` tool which tracks steps and progress and renders them to the user. Using the tool helps demonstrate that you've understood the task and convey how you're approaching it. Plans can help to make complex, ambiguous, or multi-phase work clearer and more collaborative for the user. A good plan should break the task into meaningful, logically ordered steps that are easy to verify as you go. Note that plans are not for padding out simple work with filler steps or stating the obvious.
Use a plan when:
- The task is non-trivial and will require multiple actions over a long time horizon.
- There are logical phases or dependencies where sequencing matters.
- The work has ambiguity that benefits from outlining high-level goals.
- You want intermediate checkpoints for feedback and validation.
- When the user asked you to do more than one thing in a single prompt
- The user has asked you to use the plan tool (aka "TODOs")
- You generate additional steps while working, and plan to do them before yielding to the user

Skip a plan when:
- The task is simple and direct.
- Breaking it down would only produce literal or trivial steps.

Planning steps are called "steps" in the tool, but really they're more like tasks or TODOs. As such they should be very concise descriptions of non-obvious work that an engineer might do like "Write the API spec", then "Update the backend", then "Implement the frontend". On the other hand, it's obvious that you'll usually have to "Explore the codebase" or "Implement the changes", so those are not worth tracking in your plan.

It may be the case that you complete all steps in your plan after a single pass of implementation. If this is the case, you can simply mark all the planned steps as completed. The content of your plan should not involve doing anything that you aren't capable of doing (i.e. don't try to test things that you can't test). Do not use plans for simple or single-step queries that you can just do or answer immediately.
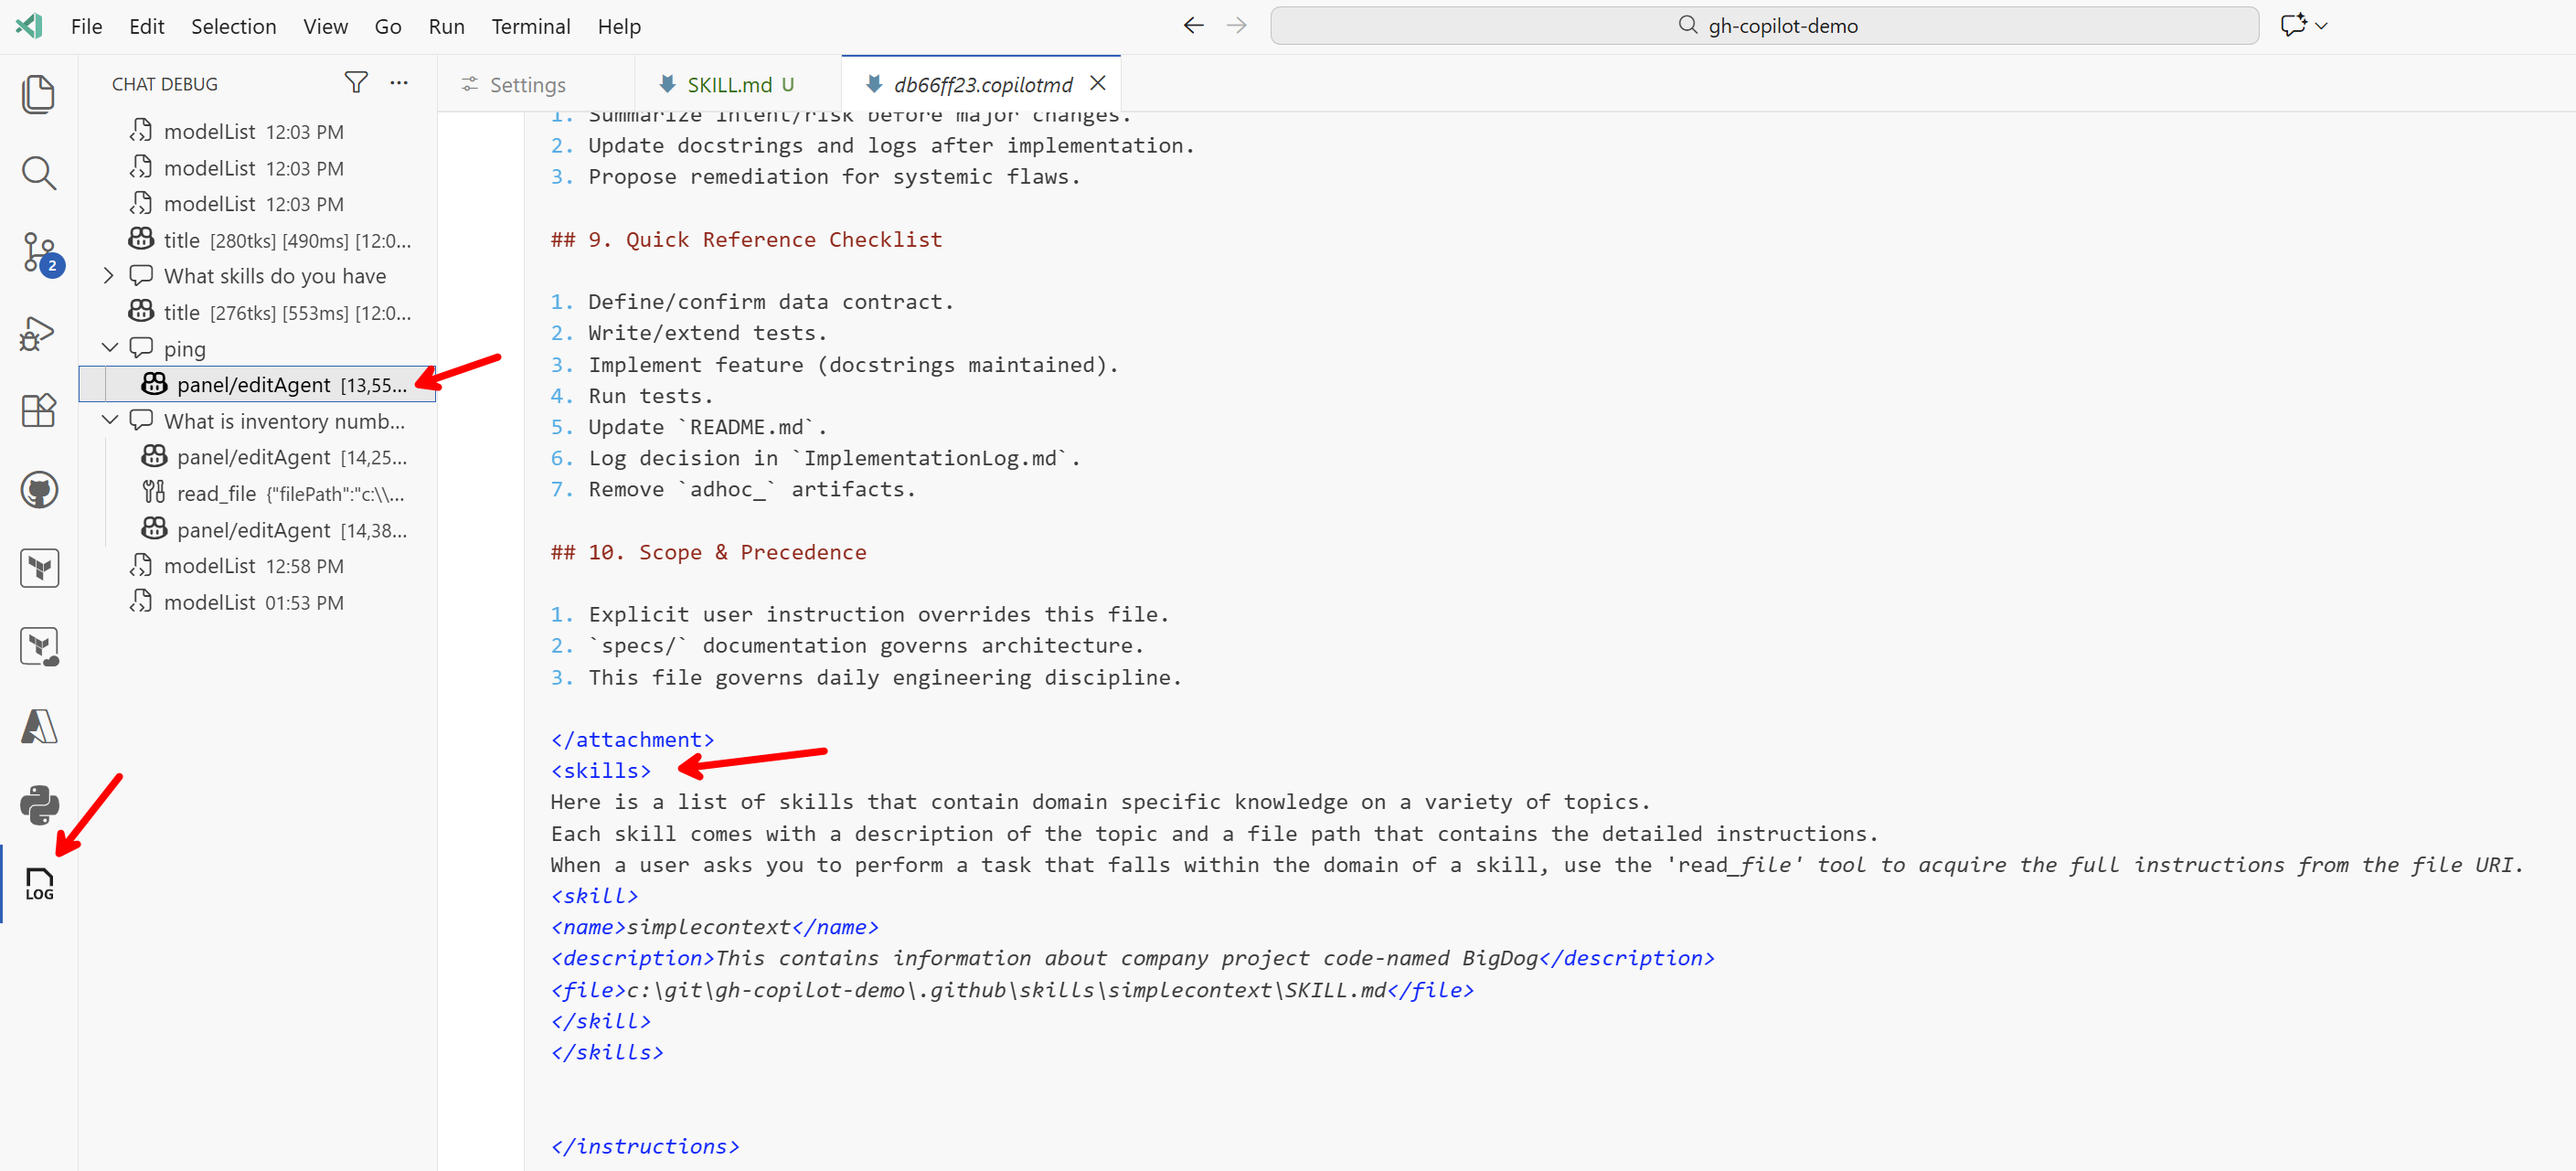
Je tam toho ještě hromada! Nicméně pak přijde <attachment> ve kterém vidím obsah mého AGENTS.md (tedy instrukce připojené do kontextu podle nastavení). No a pak už je sekce skills:
1
2
3
4
5
6
7
8
9
10
<skills>
Here is a list of skills that contain domain specific knowledge on a variety of topics.
Each skill comes with a description of the topic and a file path that contains the detailed instructions.
When a user asks you to perform a task that falls within the domain of a skill, use the 'read_file' tool to acquire the full instructions from the file URI.
<skill>
<name>simplecontext</name>
<description>This contains information about company project code-named BigDog</description>
<file>c:\git\gh-copilot-demo\.github\skills\simplecontext\SKILL.md</file>
</skill>
</skills>
A tady je jádro toho jak to funguje. V kontextu je pouze název a popis, nikoli celé instrukce nebo další soubory. Na dotaz Ping nepotřeboval model tento skill a kontext použít, jednoduše odpověděl.
V těle jsou ještě další věci typu informace o složkách, o uživateli, ale pak už je vidět jednoduchá odpověď modelu.
1
pong — I'm here and ready. What would you like me to do next?
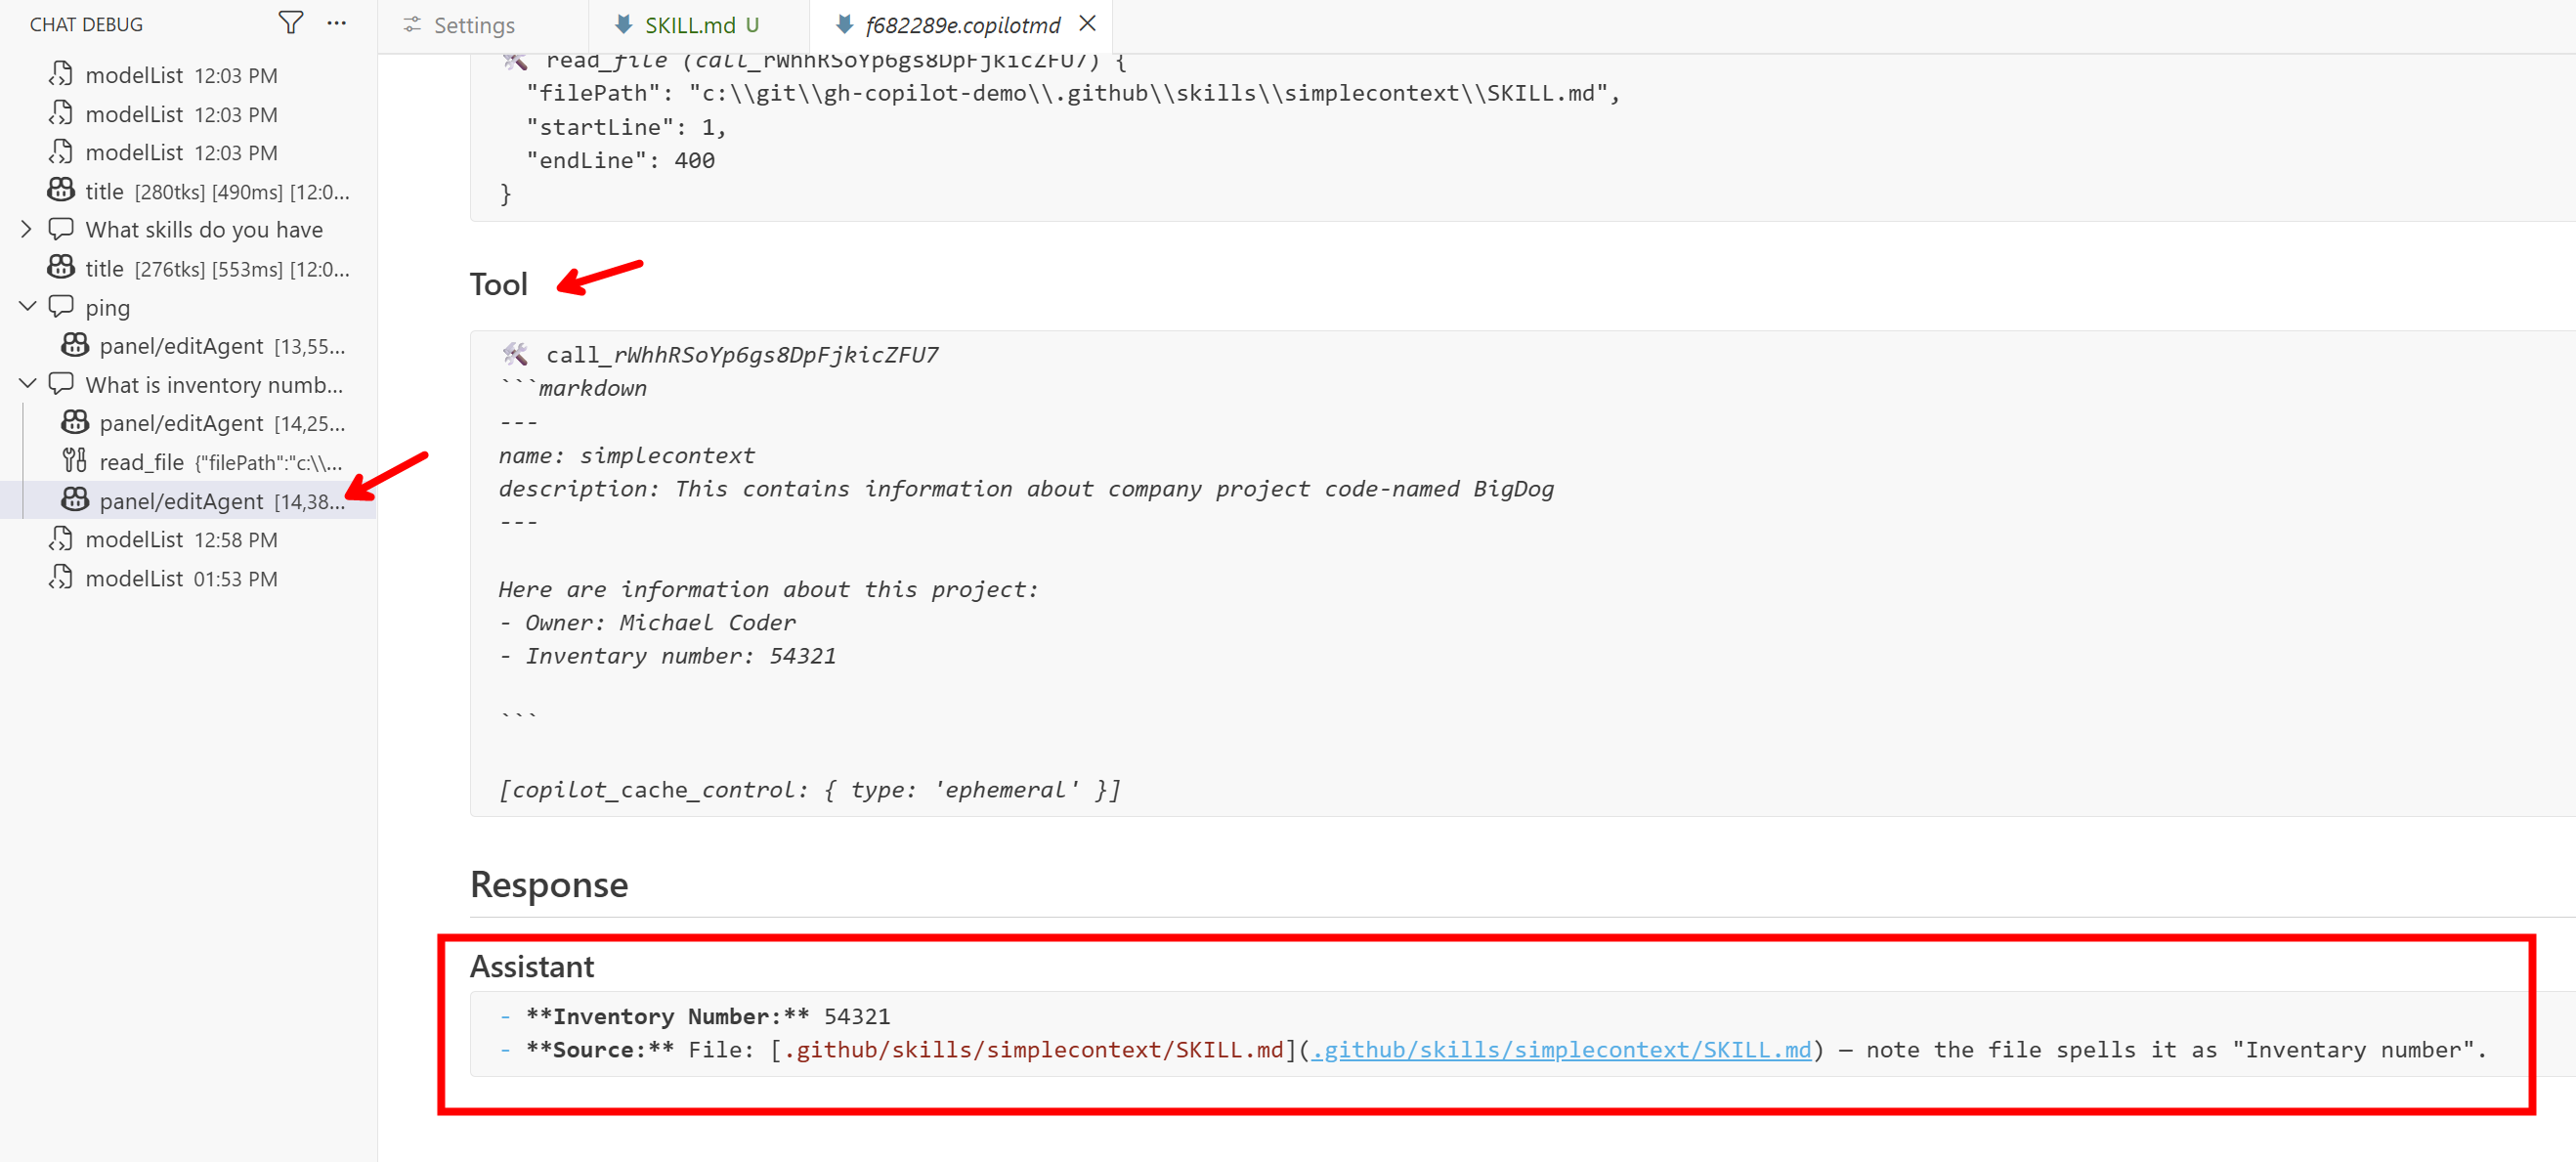
A teď to přijde, zeptám se What is inventory number for BigDog. Tato informace není součástí kontextu, není v názvu ani popisu skillu, nicméně model by měl z popisu pochopit, že pro zodpovězení mé otázky bude dobré se skill načíst. A přesně to udělal.
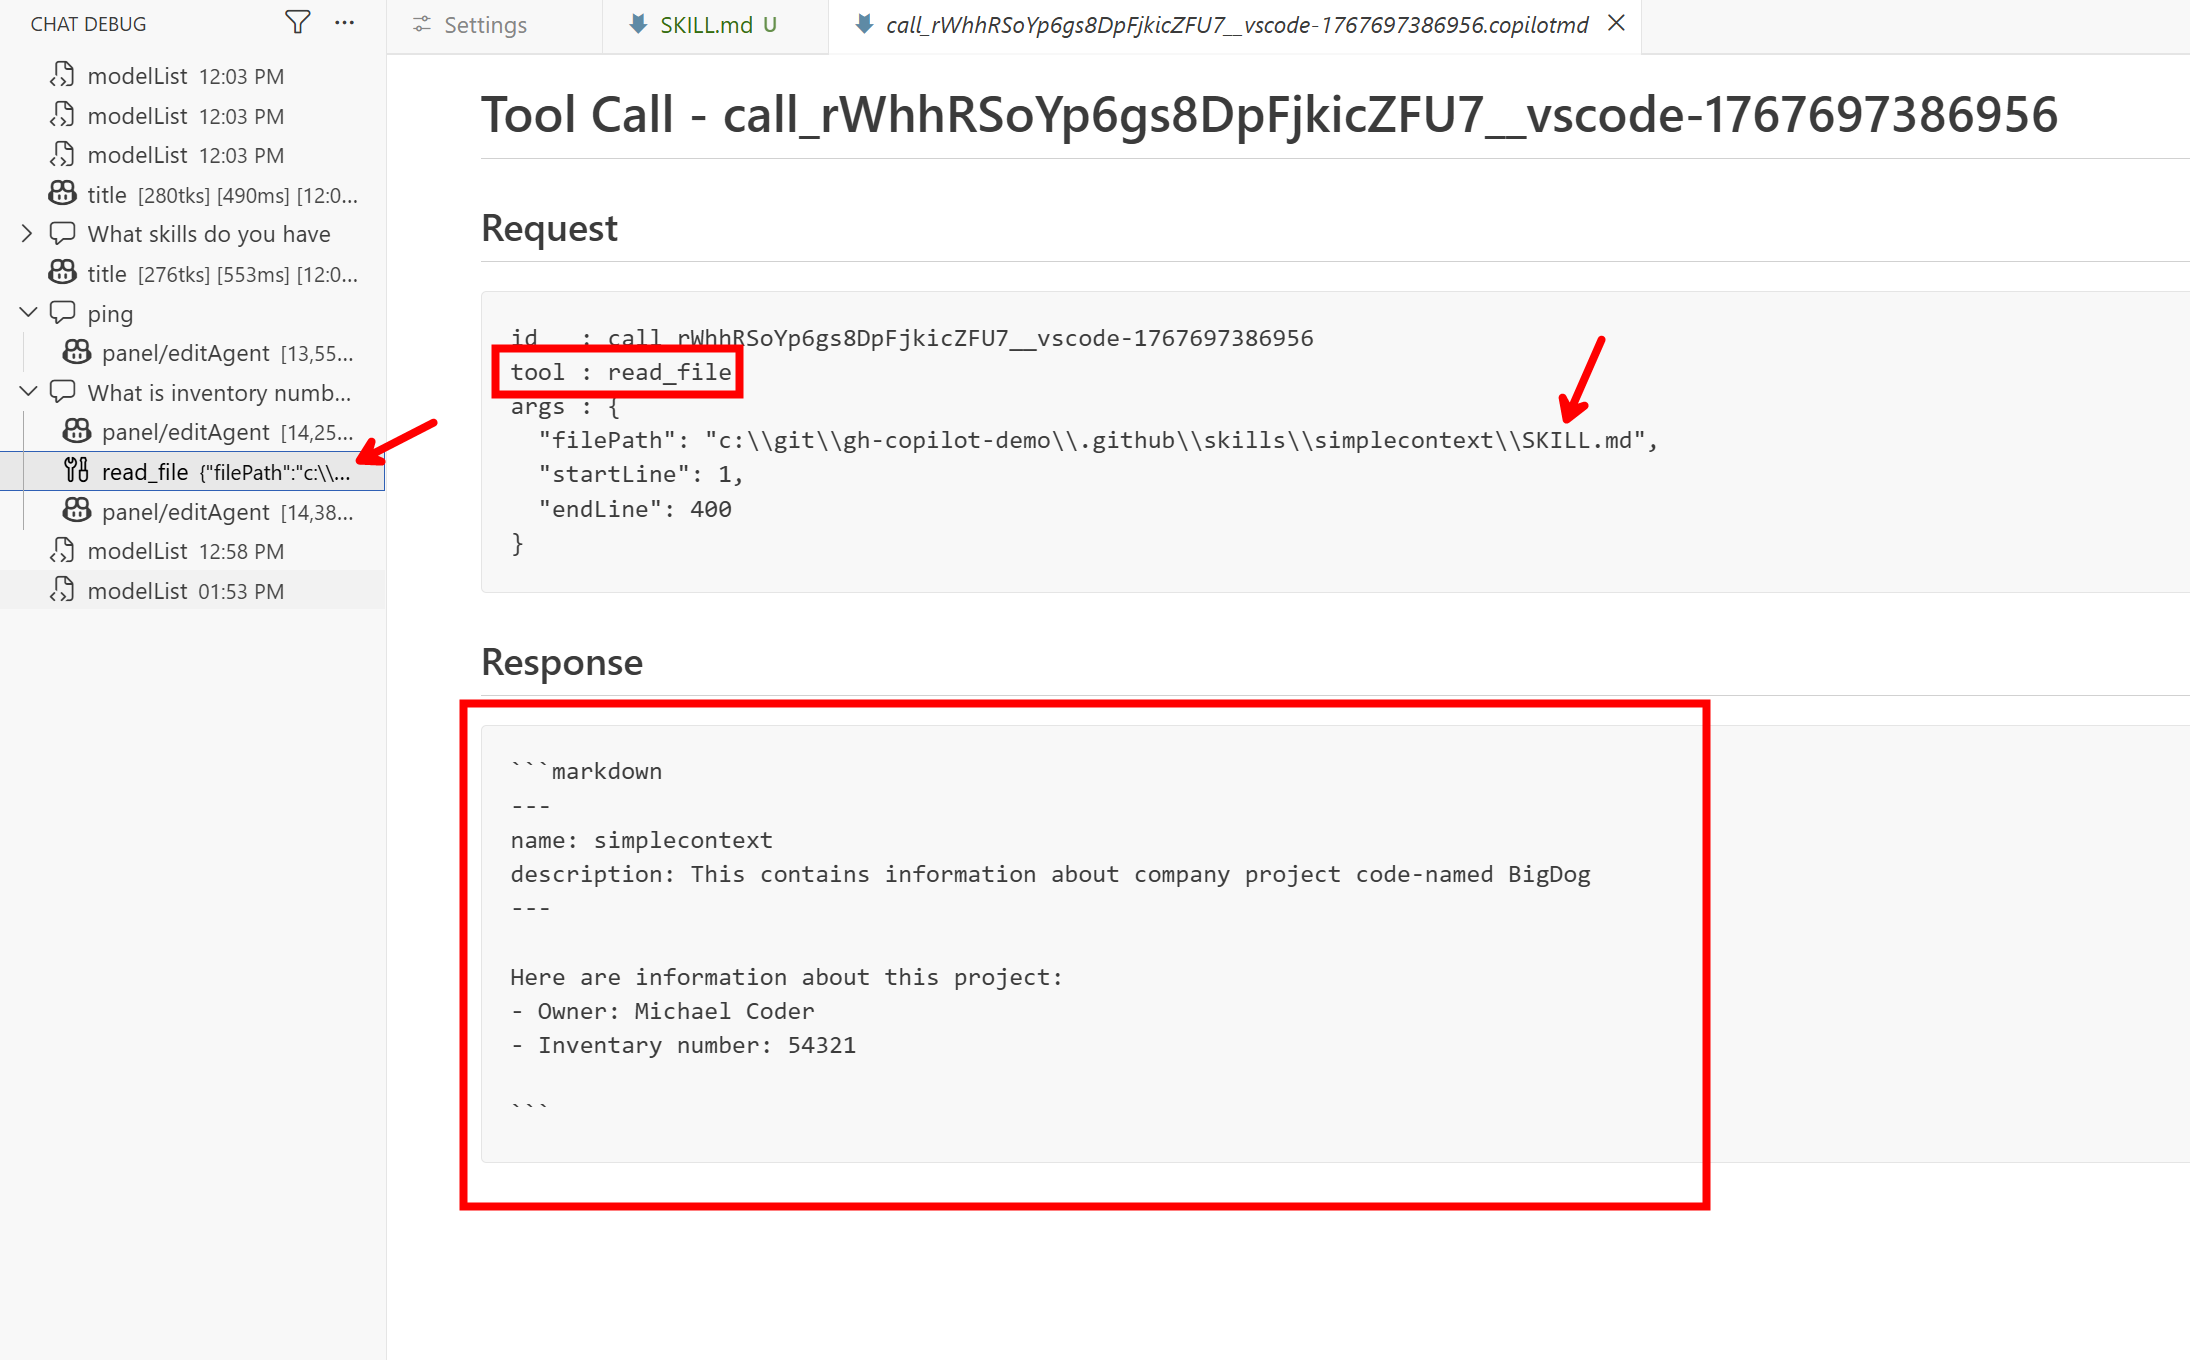
Vidíme, že model se rozhodl použít nástroj pro čtení souboru a obsah SKILL.md si načetl a díky tomu ví odpověď.
Skills pro vysvětlení modelu jako používat vaše připravené skripty
Udělejme se příklad s vlastním skriptem, kde vysvětlíme v rámci skillu jak s ním pracovat. Tady je můj SKILL.md:
1
2
3
4
5
6
7
8
9
10
11
12
13
14
15
16
17
18
19
20
21
22
23
24
---
name: json-to-xml-converter
description: Convert JSON data to XML format with customizable root element and attribute handling
---

# JSON to XML Converter Skill

## Purpose

Convert JSON data structures into well-formed XML documents. Handles nested objects, arrays, and primitive types.

## Usage

### Command Line

```bash
# Basic conversion
python .github/skills/json-to-xml-converter/scripts/json2xml.py input.json output.xml

# Custom root element
python .github/skills/json-to-xml-converter/scripts/json2xml.py input.json output.xml --root "data"

# Pipe data
echo '{"name": "test"}' | python .github/skills/json-to-xml-converter/scripts/json2xml.py - -
Parameters
input_file: Path to JSON file or-for stdinoutput_file: Path to XML output file or-for stdout--root: Root element name (default: “root”)
Example
Input JSON:
1
{"user": {"name": "Alice", "age": 30}, "items": [1, 2, 3]}
Output XML:
1
2
3
4
5
6
7
8
9
10
11
12
<?xml version="1.0" encoding="utf-8"?>
<root>
  <user>
    <name>Alice</name>
    <age>30</age>
  </user>
  <items>
    <item>1</item>
    <item>2</item>
    <item>3</item>
  </items>
</root>
Agent Integration
Use run_in_terminal to invoke the script:
1
python .github/skills/json-to-xml-converter/scripts/json2xml.py input.json output.xml --root "mydata"
Important Notes:
- No external dependencies (Python stdlib only)
- JSON keys with spaces are converted to underscores
- Arrays become
<item>elements - Handles invalid JSON with clear error messages ```
A v adresáři skripts je kromě README.md a pyproject.toml ještě samotný kód:
1
2
3
4
5
6
7
8
9
10
11
12
13
14
15
16
17
18
19
20
21
22
23
24
25
26
27
28
29
30
31
32
33
34
35
36
37
38
39
40
41
42
43
44
45
46
47
48
49
50
51
52
53
54
55
56
57
58
59
60
61
62
63
64
65
66
67
68
69
70
71
72
73
74
75
76
77
78
79
80
81
82
83
84
85
86
87
88
89
90
91
92
93
94
95
96
97
98
99
100
101
102
103
104
105
106
107
108
109
110
111
112
113
114
115
116
117
118
119
120
121
122
123
124
125
126
127
128
129
130
131
132
133
134
135
136
137
138
139
140
141
142
143
144
145
146
147
148
149
150
151
152
153
154
155
156
157
158
159
160
161
162
163
164
165
166
167
168
169
170
171
172
173
174
175
176
177
178
179
180
181
182
183
184
185
186
187
188
189
190
191
192
193
194
195
196
197
198
199
200
201
202
203
204
205
206
207
208
209
210
211
212
213
214
215
216
217
218
#!/usr/bin/env python3
"""
JSON to XML Converter

Converts JSON data structures to well-formed XML documents.
Handles nested objects, arrays, and primitive types.
"""

import json
import sys
import argparse
import xml.etree.ElementTree as ET
from typing import Any, Optional
from pathlib import Path


def sanitize_tag_name(name: str) -> str:
    """
    Sanitize a string to be a valid XML tag name.

    Args:
        name: The string to sanitize

    Returns:
        A valid XML tag name
    """
    # Replace spaces and invalid characters with underscores
    sanitized = name.replace(' ', '_')
    sanitized = ''.join(c if c.isalnum() or c in ('_', '-', '.') else '_' for c in sanitized)

    # Ensure it doesn't start with a digit
    if sanitized and sanitized[0].isdigit():
        sanitized = '_' + sanitized

    # Ensure it's not empty
    if not sanitized:
        sanitized = 'item'

    return sanitized


def dict_to_xml(data: Any, parent: Optional[ET.Element] = None, tag_name: str = 'item') -> ET.Element:
    """
    Convert a dictionary or other data structure to XML elements.

    Args:
        data: The data to convert (dict, list, or primitive)
        parent: The parent XML element (None for root)
        tag_name: The tag name to use for this element

    Returns:
        An XML Element
    """
    if parent is None:
        element = ET.Element(sanitize_tag_name(tag_name))
    else:
        element = ET.SubElement(parent, sanitize_tag_name(tag_name))

    if isinstance(data, dict):
        # Handle dictionary - create child elements for each key
        for key, value in data.items():
            dict_to_xml(value, element, key)
    elif isinstance(data, list):
        # Handle list - create 'item' elements for each entry
        for item in data:
            dict_to_xml(item, element, 'item')
    elif data is None:
        # Handle null values
        element.text = ''
    else:
        # Handle primitive types (str, int, float, bool)
        element.text = str(data)

    return element


def convert_json_to_xml(json_str: str, root_name: str = 'root') -> str:
    """
    Convert a JSON string to an XML string.

    Args:
        json_str: The JSON string to convert
        root_name: The name of the root XML element

    Returns:
        A formatted XML string

    Raises:
        json.JSONDecodeError: If the JSON is invalid
    """
    data = json.loads(json_str)
    root = dict_to_xml(data, tag_name=root_name)

    # Pretty print the XML
    indent_xml(root)

    # Convert to string with XML declaration
    xml_str = ET.tostring(root, encoding='utf-8', xml_declaration=True).decode('utf-8')

    return xml_str


def indent_xml(elem: ET.Element, level: int = 0) -> None:
    """
    Add indentation to XML elements for pretty printing.

    Args:
        elem: The XML element to indent
        level: The current indentation level
    """
    indent = "\n" + "  " * level
    if len(elem):
        if not elem.text or not elem.text.strip():
            elem.text = indent + "  "
        if not elem.tail or not elem.tail.strip():
            elem.tail = indent
        for child in elem:
            indent_xml(child, level + 1)
        if not child.tail or not child.tail.strip():
            child.tail = indent
    else:
        if level and (not elem.tail or not elem.tail.strip()):
            elem.tail = indent


def json_file_to_xml_file(input_path: str, output_path: str, root_name: str = 'root') -> None:
    """
    Convert a JSON file to an XML file.

    Args:
        input_path: Path to input JSON file (or '-' for stdin)
        output_path: Path to output XML file (or '-' for stdout)
        root_name: The name of the root XML element

    Raises:
        FileNotFoundError: If input file doesn't exist
        json.JSONDecodeError: If the JSON is invalid
    """
    # Read input
    if input_path == '-':
        json_str = sys.stdin.read()
    else:
        with open(input_path, 'r', encoding='utf-8') as f:
            json_str = f.read()

    # Convert
    xml_str = convert_json_to_xml(json_str, root_name)

    # Write output
    if output_path == '-':
        sys.stdout.write(xml_str)
    else:
        with open(output_path, 'w', encoding='utf-8') as f:
            f.write(xml_str)


def main() -> int:
    """
    Main entry point for the CLI.

    Returns:
        Exit code (0 for success, 1 for error)
    """
    parser = argparse.ArgumentParser(
        description='Convert JSON files to XML format',
        formatter_class=argparse.RawDescriptionHelpFormatter,
        epilog="""
Examples:
  %(prog)s input.json output.xml
  %(prog)s input.json output.xml --root data
  echo '{"name": "test"}' | %(prog)s - -
  %(prog)s - - < input.json > output.xml
        """
    )

    parser.add_argument(
        'input',
        help='Input JSON file (use "-" for stdin)'
    )
    parser.add_argument(
        'output',
        help='Output XML file (use "-" for stdout)'
    )
    parser.add_argument(
        '--root',
        default='root',
        help='Name of the root XML element (default: root)'
    )
    parser.add_argument(
        '--version',
        action='version',
        version='%(prog)s 1.0.0'
    )

    args = parser.parse_args()

    try:
        json_file_to_xml_file(args.input, args.output, args.root)

        # Print success message if not using stdout
        if args.output != '-':
            print(f"✓ Successfully converted {args.input} to {args.output}", file=sys.stderr)

        return 0

    except FileNotFoundError as e:
        print(f"Error: Input file not found: {e}", file=sys.stderr)
        return 1
    except json.JSONDecodeError as e:
        print(f"Error: Invalid JSON: {e}", file=sys.stderr)
        return 1
    except Exception as e:
        print(f"Error: {e}", file=sys.stderr)
        return 1


if __name__ == '__main__':
    sys.exit(main())
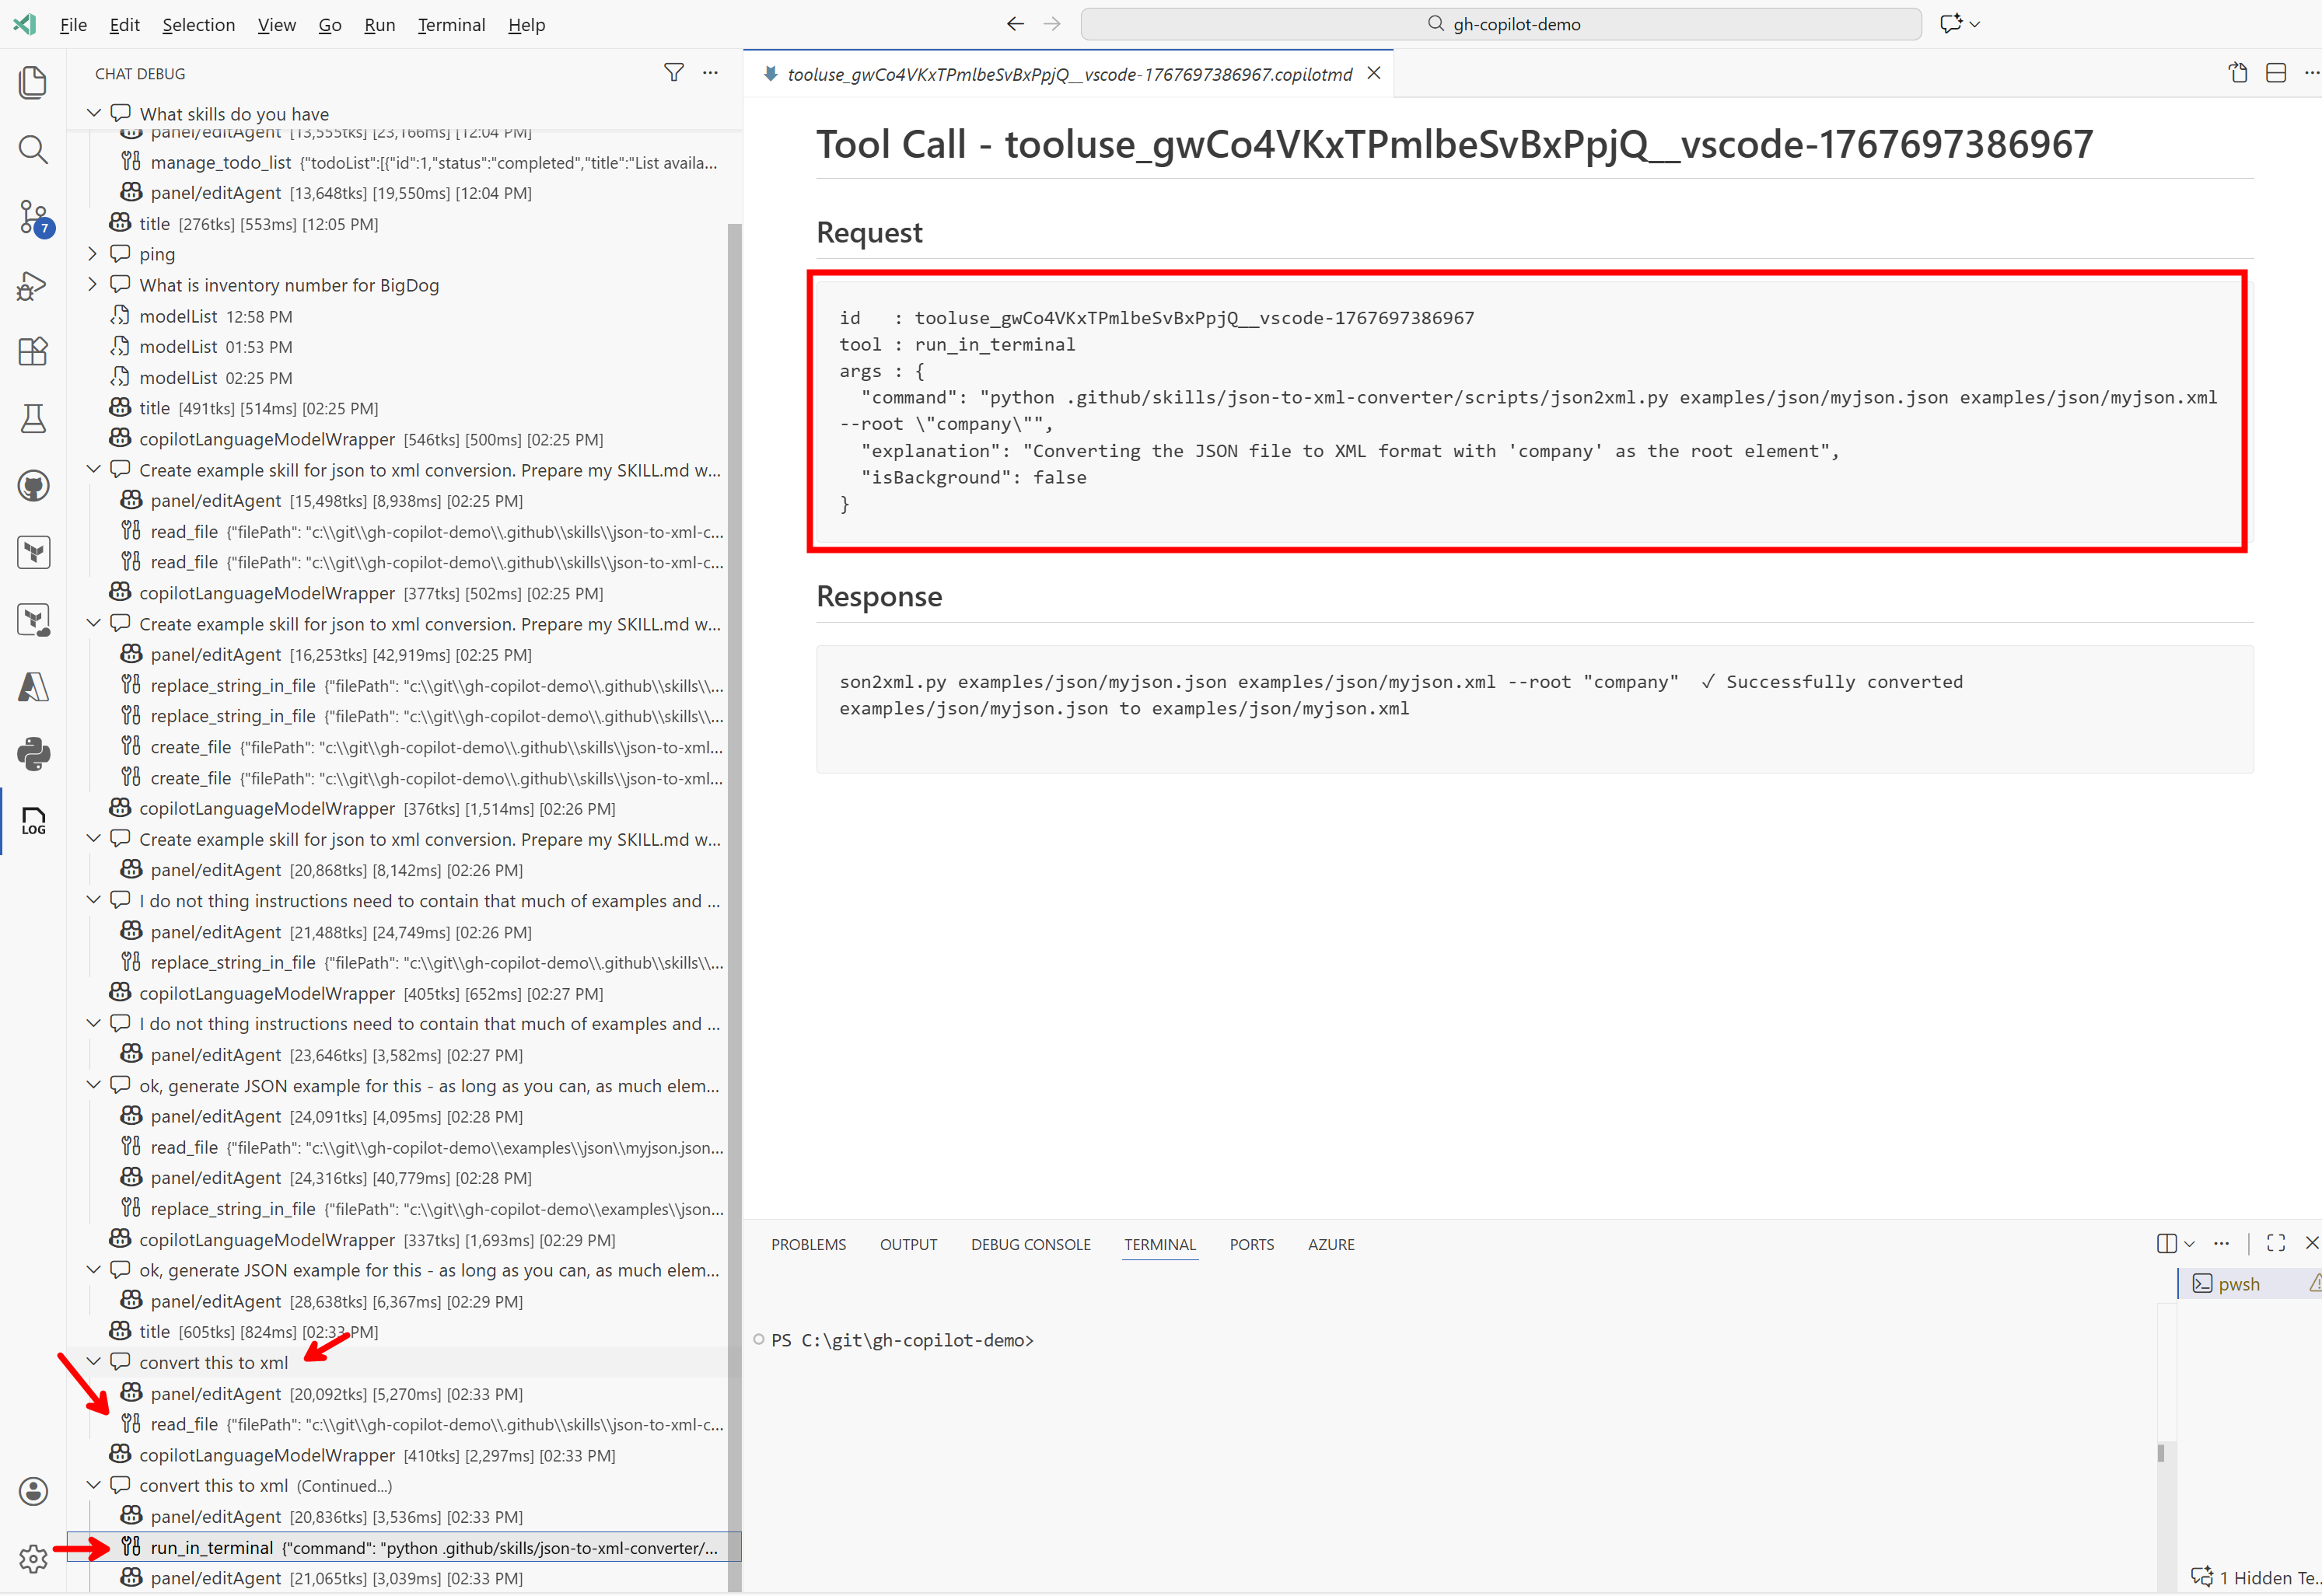
Tento skill teď můžeme jednoduše použít. Vzal jsem JSON soubor, přihodil do v chatu do kontextu a řekl convert this to xml. Agent správně vyhodnotil, že bude dobré použít na to tento skill, načetl si z něj instrukce a spustil skript. Výborný výsledek!
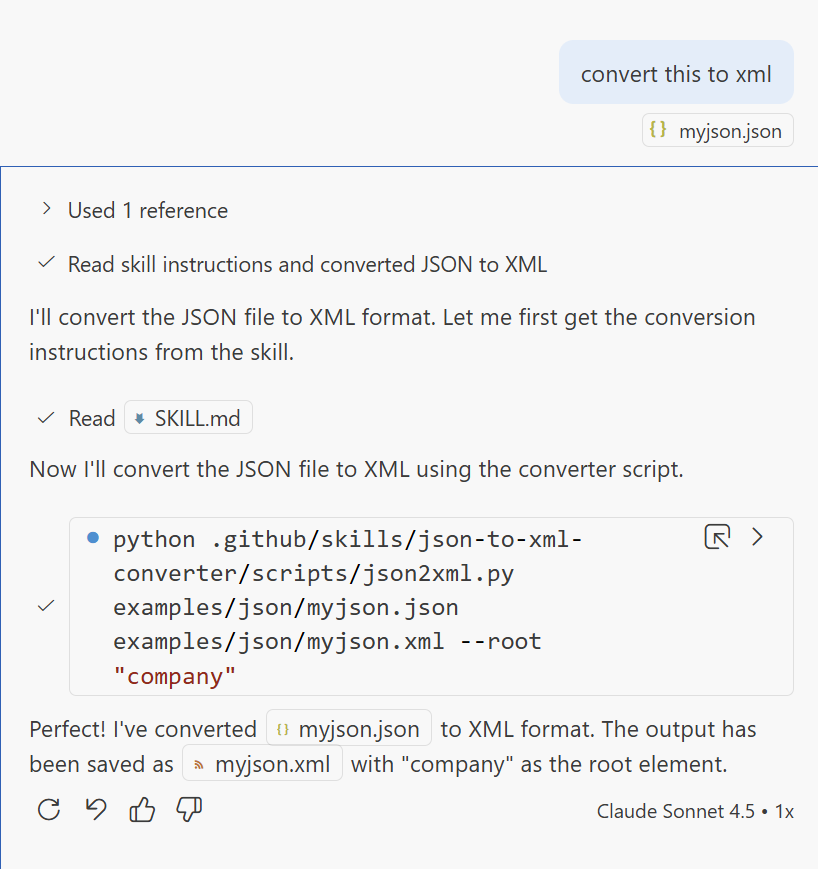
Tady pohled na debug log.
Pár dalších příkladů najdete na GitHubu Anthropicu
Pozor při stahování skills z internetu: často obsahují skripty a ty se pak spouští lokálně pod právy vašeho uživatele - vždycky je před použitím projděte a neschvalujte spouštění naslepo.
Za mě Agent Skills nejsou nic šokujícím způsobem nového a podobného výsledku šlo dosáhnout i s běžným AGENTS.md, ale museli byste v něm sami vést seznam skillů a ty mít někde uložené a je to práce navíc a hlavně hrozící nekonzistence a obtížná přenositelnost mezi projekty. Skills tohle standardizují a předpokládám, že se to stane běžnou součástí tuningu jednotlivých modelů - předpokládám, že protože to Anthropic vymyslel, tak už v Claude modelech bude přitrénované a u OpenAI CODEX a Google se to dá rozhodně očekávat taky. Nejen tedy, že to bude standardizované, ale LLM na to bude specificky připraveno a bude to tak fungovat i mnohem spolehlivěji.
Skills řeší dvě věci - elegantní načítání kontextu až když je to opravdu potřeba a možnost vytvářet odlehčené nástroje ve formě skriptů bez celé vrstvy MCP a s tím spojených věcí k řešení (kde to poběží, jak se to zabezpečí, kde bude katalog). Pro pomocníky v rámci projektu výborná varianta.